June 28, 2009

Cross Up Ponies

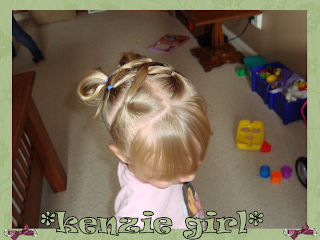
First I apologise for the crappy pics, we were on our way out to church and I wanted to snap a couple quick pics of this do, View from the front:

This style is super cute and pretty easy to do. She got tons of compliments on it today. I'm not going to do a step by step as you can pretty much see what I did but for a brief description:
1. Part out a centre part.
2. Starting at the bottom section out a small piece on each side and put in an elastic
3. cross the first ones over each other and add to the next sections
4. Continue up until you reach the top of the head
5. Again, Kenz has bangs so I pulled them up and added them to the section with the ponies, straight back.
6. Add ribbon or bows.
View from the back:
From the top:

Another back view:


June 25, 2009

Braided Ponies

This is a quick and easy do for something with a little extra and no extra time. Begin by sectioning a square out on top of the head and french braid that section as far back as the section goes and continue regular braiding til the end.

Divide the rest of the hair into two ponies and add the braid into one of the ponies.
Braid both the ponies as far as you can and loop back up securing with an elastic. Spike any loose ends (or curl them) and add bows.
This took about 5 minutes before we left for the school and looked super cute!
View from the front... doesn't she look impressed... with the bangs we just combed them to the sides today.


June 24, 2009

Twist and Shout


This is a fun and easy style to do, and it's great for summer because it keeps hair up and off the neck/face/shoulders.
To begin part the hair down the middle front to back and pull 1 side out of the way while you work.
Take the half that you are working with and divide into sections going back. If you are trying to keep bangs off of a face like I am you can pull the first section with bangs directly into the next section.

Take the front section and start twisting until you are past the next elastic.

Add the twist into the next elastic and comb out the hair.

Continue all the way back on both side so you have two sets of twist braids. Ta Da!

View from top front so you can see that I took her bangs directly to the second section without twisting them.

Another view from the front:


June 22, 2009

Bangs Pulled Back to Braid

Since we're growing out Kenz's bangs and they are always in her eyes we've been doing alot of things like this style lately. It's pretty self explanatory but if you need step by step instructions:
1. Part the hair down the centre and do a horizontal part across the front. Our first one was just her bangs.
2. Add those parts into the next small sections.
3. Add the second sections into the third crossing over into the opposite side.
4. combine the third sections together into 1 at the fourth section.
5. braid and secure the fourth section.
My sections are really crooked in these pics so pay no attention to that. It is a really cute hairstyle when the sections are a little more even.


June 20, 2009

Elastic Braids, Messy Buns

This is a very easy hair style and cute for girls with long or short hair. Section the hair horizontally and put in two elastics. Add those sections to the next sections. I have three elastics on the top, and two coming from the bottom meeting the middle elastic.
View from the back:

You can either leave it in ponies as above or turn it into messy buns and add cute bows:


Twisted Ponies

This is another cute variation on two pony-tails. Yes we do lots of similar styles here. This one we start out with a small part in front and do two small ponies. Then divide out the next section and taking the two from the front cross them over each other twice to form a twist. I did one more section like this on the top and then I went up the back of her head doing a section like this. Then I just looped the ponies into a sorta half ponytail and left it there.
Yes, I know her bangs are atrocious. We're growing them out so most of the time they are pulled back this day they just happened to be left down.


June 18, 2009

Day After Simplicity

We don't always do something fancy here. Sometimes day after do's are the simplest and cutest thing we do.
For this do we left french braids in for a full day and then the following morning took them out and just finger-combed through them adding a pretty blue headband! Simple and Cute!


June 16, 2009

Elastic Madness

This is a fun way to pull the hair back off of her face and neck for the summer without doing just a plain old pony.
Start off with a part down the centre (somewhat) and take a square from the front and put it in an elastic. Do the same with the other side of the part.

Take another square on one side of the part and add in the opposite piece from the front. Repeat forming an "X".
Repeat this until you are at the back of her head.
Now for the sides: start at the front and do an elastic braid back following the same parts as earlier. Don't forget on the last one to add everything from the back in that section. Repeat on the other side.
Now take the two sides and bring them together into a pony in the back under the other two:
This gives the overall pony some height for those of us with kids with fairly thin hair in pony tails.
Next I added a fairly small bow:
There! It's finished!


June 15, 2009

Crazy Braids

Before we begin with the style, don't forget to check out the giveaway going on here!
See why I call these crazy braids? It drives me crazy getting the parts straight and getting her to sit still while I do it. But I absolutely love this style and think it's such a pretty look to do with a little sundress or to wear to church.
To Begin: Part the hair about an inch back horizontally from ear to ear: (My part looks wider because of her bangs)

Start at one ear french braiding taking from only one side and braid all the way across and keep normal braiding when you run out of hair to add. Tie it off with an elastic and do another part just back from that:
Start at the opposit ear this time and braid across just like above (Yes I know my parts are very crooked!)
Do two more sections in the back going back and forth in direction. You should now have two braid ends on each side of her head:
I didn't show this step but take both braids and tie them together then tuck underneath and pin into place with a small bobby pin:
Smile:


Giveaway at Sugar and Spice

One of the blogs that I like to follow regularly is Sugar and Spice and All Hair Nice so I thought I'd post about this cool giveaway that they are having that started TODAY! So go on over and check it out!


June 09, 2009

4 (and a half) Braids

Okay this is my second post today, I know, I'm just trying to catch up from last weekend when I had a whole bunch to post and then my modem broke so I had no internet... Anyways... This is a pretty basic do and I do it usually for the crimps in her hair the next day. We did this yesterday and it held through all day yesterday plus today so we'll be taking it out tomorrow and doing a fun do.
Divide the hair into 4 sections and french (or dutch) braid:

Pull the four braids together in the back and put in an elastic holding them underneath so they form a kinda bun thing:
Braid the bangs if your daughter has them... for some reason I couldn't get them to stay in a french braid so I ended up dutch braiding... still looks cute.
I used this ribbon tied bobby pin to hold the end of the top braid at the start of the next braid and then stuck another in on the other side so it looked even:
This is one of those styles that looks complicated to non-hair-doers but if you know how to french braid really takes no time at all:
She was happy that it was a quick style:


Related Posts Plugin for WordPress, Blogger...